Build a Blogging website using Node, Express and MongoDB: Part 2
Project based learning blog.


In our previous blog Build a Blogging website using Node, Express and MongoDB: Part 1 (hashnode.dev), we revised the concepts of Node, Express, and EJS templating and wrote the boilerplate code for our project. In this Blog which is in continuation with Part 1, we will be improving EJS templates adding styling to our project, understanding the basics of MongoDB, creating clusters and connecting MongoDB clusters to our application.
EJS templating
In partials folder of view folder, we create a file search.ejs and add the following code snippet
<div class="searchBar">
    <div class="container">
        <form action="/search" class="search_form" role="search" method="post">
            <input type="search" aria-label="Search" id="searchInput" name="searchTerm" placeholder="Search..." autocomplete="off">
        </form>
    </div>
</div>
We need to add this snippet in our main.ejs. Here's the modified main.ejs file. I have shared the <body> tag so replace the new <body> tag with the old one.
<body>
    <%- include('../partials/search') %>
    <div class="container">
        <%- include('../partials/header') %>
            <main class="main">
                <%- body %>
            </main>
            <%- include('../partials/footer') %>
    </div>
</body>
Styling our Application
Here's the CSS code we will be using in our project. I have tried to explain the CSS code with the comments
@import url('https://fonts.googleapis.com/css2?family=Open+Sans:ital,wght@0,300;0,400;0,500;0,600;0,700;1,500;1,600&display=swap');

/* We have declared the variables which will be frequently used in the CSS file */
:root {
    --black: #1c1c1c;
    --gray: #7E7E7E;
    --gray-light: #E4E4E4;
    --red: #b30000;
    --font-size-base: 1rem;
    --font-size-md: clamp(1.25rem, 0.61vw + 1.1rem, 1.58rem);
    --font-size-lg: clamp(1.56rem, 1vw + 1.31rem, 2.11rem);
    --font-size-xl: clamp(2.44rem, 2.38vw + 1.85rem, 3.75rem);
    --border-radius: 0.625rem;
}

/* What is clamp */
/* clamp() is a CSS function that takes three values and returns the middle value within a range of values between a defined minimum and maximum bound. */

/* We have applied the simple CSS reset. We have used all the text font to be used as Open Sans and color to be black with font size of 1 rem. A background image of noise is also applied */
body {
    /* CSS Reset */
    margin: 0;
    padding: 0;
    box-sizing: border-box;

    /* body styling */
    font-family: 'Open Sans', sans-serif;
    color: var(--black);
    font-size: var(--font-size-base);
    background-color: #FAF5EE;
    background-image: url("/img/img-noise-361x370.png");
}

/* Layout */

/* container contains our entire website. */
.container {
    max-width: 58rem;
    margin: 0 auto;
    padding: 0 10px;
}

/* container where our route will be rendered. Basic padding added */
.main {
    padding: 20px 0;
}

/* The input container styling */
input[type="text"],
input[type="email"],
input[type="password"],
input[type="search"],
select,
textarea {
    font-family: 'Open Sans', sans-serif;
    font-size: 1rem;
    display: block;
    box-sizing: border-box;
    width: 100%;
    padding: 0.7rem 0.75rem;
    margin-bottom: 1rem;
}

/* Button styling */
.btn {
    background-color: var(--black);
    border: none;
    color: white;
    padding: 16px 32px;
    text-decoration: none;
    margin: 4px 2px;
    cursor: pointer;
}

.btn-delete {
    padding: 10px 16px;
    background-color: var(--red);
}

/* Header image styling */
img {
    width: 100%;
    height: auto;
}

/* Hero Section styling */
.hero-image {
    max-height: 33rem;
    filter: drop-shadow(0px 44px 34px rgba(0, 0, 0, 0.25));
    overflow: hidden;
    border-radius: var(--border-radius);
}

/* Main Header styling */
.header {
    display: grid;
    align-items: center;
    grid-template-columns: 1fr 1fr;
    grid-template-rows: auto;
    grid-template-areas:
        "logo button"
        "menu menu";
    padding-top: 10px;
}

.header_logo {
    font-weight: 800;
    font-size: 25px;
    text-decoration: none;
    grid-area: logo;
}

.header_logo:hover {
    text-decoration: underline;
}

.header_nav {
    grid-area: menu;
    justify-content: center;
    display: flex;
}

.header_button {
    grid-area: button;
    display: flex;
    justify-content: end;
}

.header_logo,
.header_nav,
.header_button {
    width: 100%;
}

.header_button button {
    display: flex;
    gap: 0.3rem;
    align-items: center;
    border: 0;
    padding: 6px 12px;
    background: none;
    border-radius: 10px;
    border: 2px solid transparent;
    font-size: 1rem;
    font-weight: 600;
    color: var(--black);
}

.header_button button:hover {
    border: 2px solid var(--black);
}

/* Header -> Navigation styling */
.header_nav ul {
    list-style-type: none;
    display: flex;
    gap: 1rem;
    font-weight: 600;
    padding: 0;
}

.header_nav ul a {
    padding: 10px;
    text-decoration: none;
}

.header_nav ul a.active {
    color: #7E7E7E;
}

.header_nav ul a:hover {
    text-decoration: underline;
}

/* Author - HomePage styling */
.author {
    padding: 10px 0;
    text-align: center;
}

.author_heading {
    margin-top: 10px;
    margin-bottom: 5px;
}

.author_body {
    font-size: var(--font-size-md);
    margin: 5px 0 40px 0;
}


/* Home Article List styling */
.articles_heading {
    margin-top: 4rem;
    font-weight: 400;
}

.article_ul {
    list-style-type: none;
    padding: 0;
    margin: 0;
    font-size: clamp(1.13rem, calc(1.08rem + 0.22vw), 1.25rem);
    display: flex;
    flex-direction: column;
}

.article_list_date {
    font-size: 1rem;
    color: var(--gray);
    width: 100px;
    display: inline-block;
    width: 260px;
}

.article_ul li a {
    display: flex;
    flex-direction: column;
    justify-content: space-between;
    text-decoration: none;
    margin: 18px 0;
}

.article_ul li {
    font-size: 24px;
    cursor: pointer;
    transition: filter 0.1s;
}

.article_ul li:not(:last-child) {
    border-bottom: 1px solid var(--gray-light);
}

.article_ul li:hover {
    filter: none;
}

.article_ul:hover li {
    filter: blur(3px);
}

.article_ul:hover li:hover {
    filter: none;
}

.article {
    white-space: pre-wrap;
}

/* Footer  styling*/
.footer {
    margin: 4rem;
    text-align: center;
}


/* Dashboard Admin styling */
.admin_title {
    display: flex;
    justify-content: space-between;
    align-items: center;
}

.admin_posts {
    padding: 0;
    margin: 0;
}

.admin_post-controls form {
    display: inline-block;
}

.admin_post-controls .btn {
    display: inline-block;
    background-color: var(--black);
    color: var(--gray-light);
    border: 0;
    text-decoration: none;
    font-size: .8rem;
    padding: 4px 8px;
    line-height: 2;
}

.admin_posts li {
    display: flex;
    justify-content: space-between;
    padding: 10px 0;
}

/* Search Bar styling */
.searchBar {
    visibility: hidden;
    transform: translateY(-100px);
    background-color: var(--black);
    padding: 4px 0;
    position: absolute;
    left: 0;
    right: 0;
}


.searchBar.open {
    transform: translateY(0);
    transition: transform 0.1s;
}

.searchBar input {
    margin: 0;
    border: 0;
}

#searchClose {
    position: absolute;
    top: 0;
    right: 0;
    color: var(--gray-light);
    padding: 15px;
}

/* What is pagination */
/* Pagination is the process of dividing a large amount of content into smaller,
more manageable pages. This is often used on websites and other digital platforms to make it easier for users to find the information they are looking for. */
/* In our project "View older posts" is pagination element */

/* Pagination styling */
.pagination {
    font-size: 1.3rem;
    color: var(--gray);
    text-decoration: none;
    margin-top: 40px;
    display: inline-block;
}

.pagination:hover {
    color: var(--black);
}


/* Media Queries */

@media only screen and (min-width: 768px) {
    .header {
        grid-template-columns: auto 1fr auto;
        grid-template-areas:
            "logo menu button";
    }
}

@media only screen and (min-width: 768px) {
    .article_ul li a {
        flex-direction: row;
        align-items: center;
    }

    .article_list_date {
        text-align: right;
    }
}
Connection to MongoDB
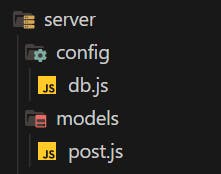
Create 2 folders inside server folder named config and models. In config we are going to create a file db.js whose sole purpose is to connect the database to the application. In models we are going to create a file models.js whose sole purpose is to create tables (schema) for our application.
After this go to MongoDB: The Developer Data Platform | MongoDB, login or sign up and you will be redirected to the below page. Click on +Create to create a new cluster.
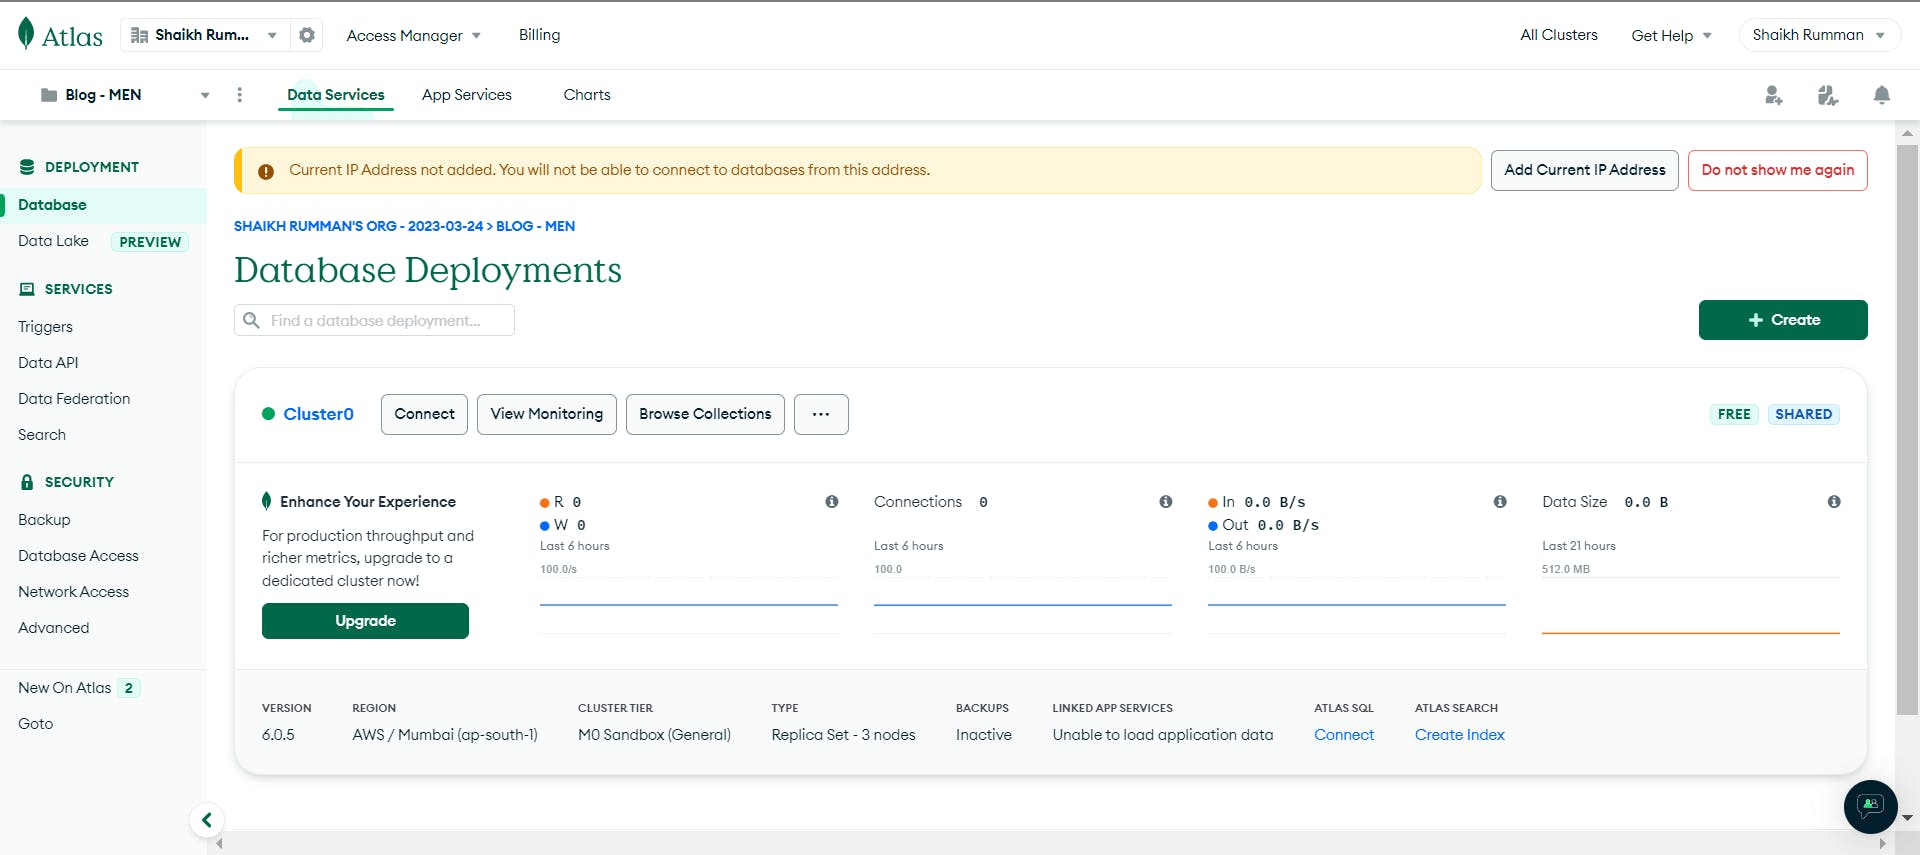
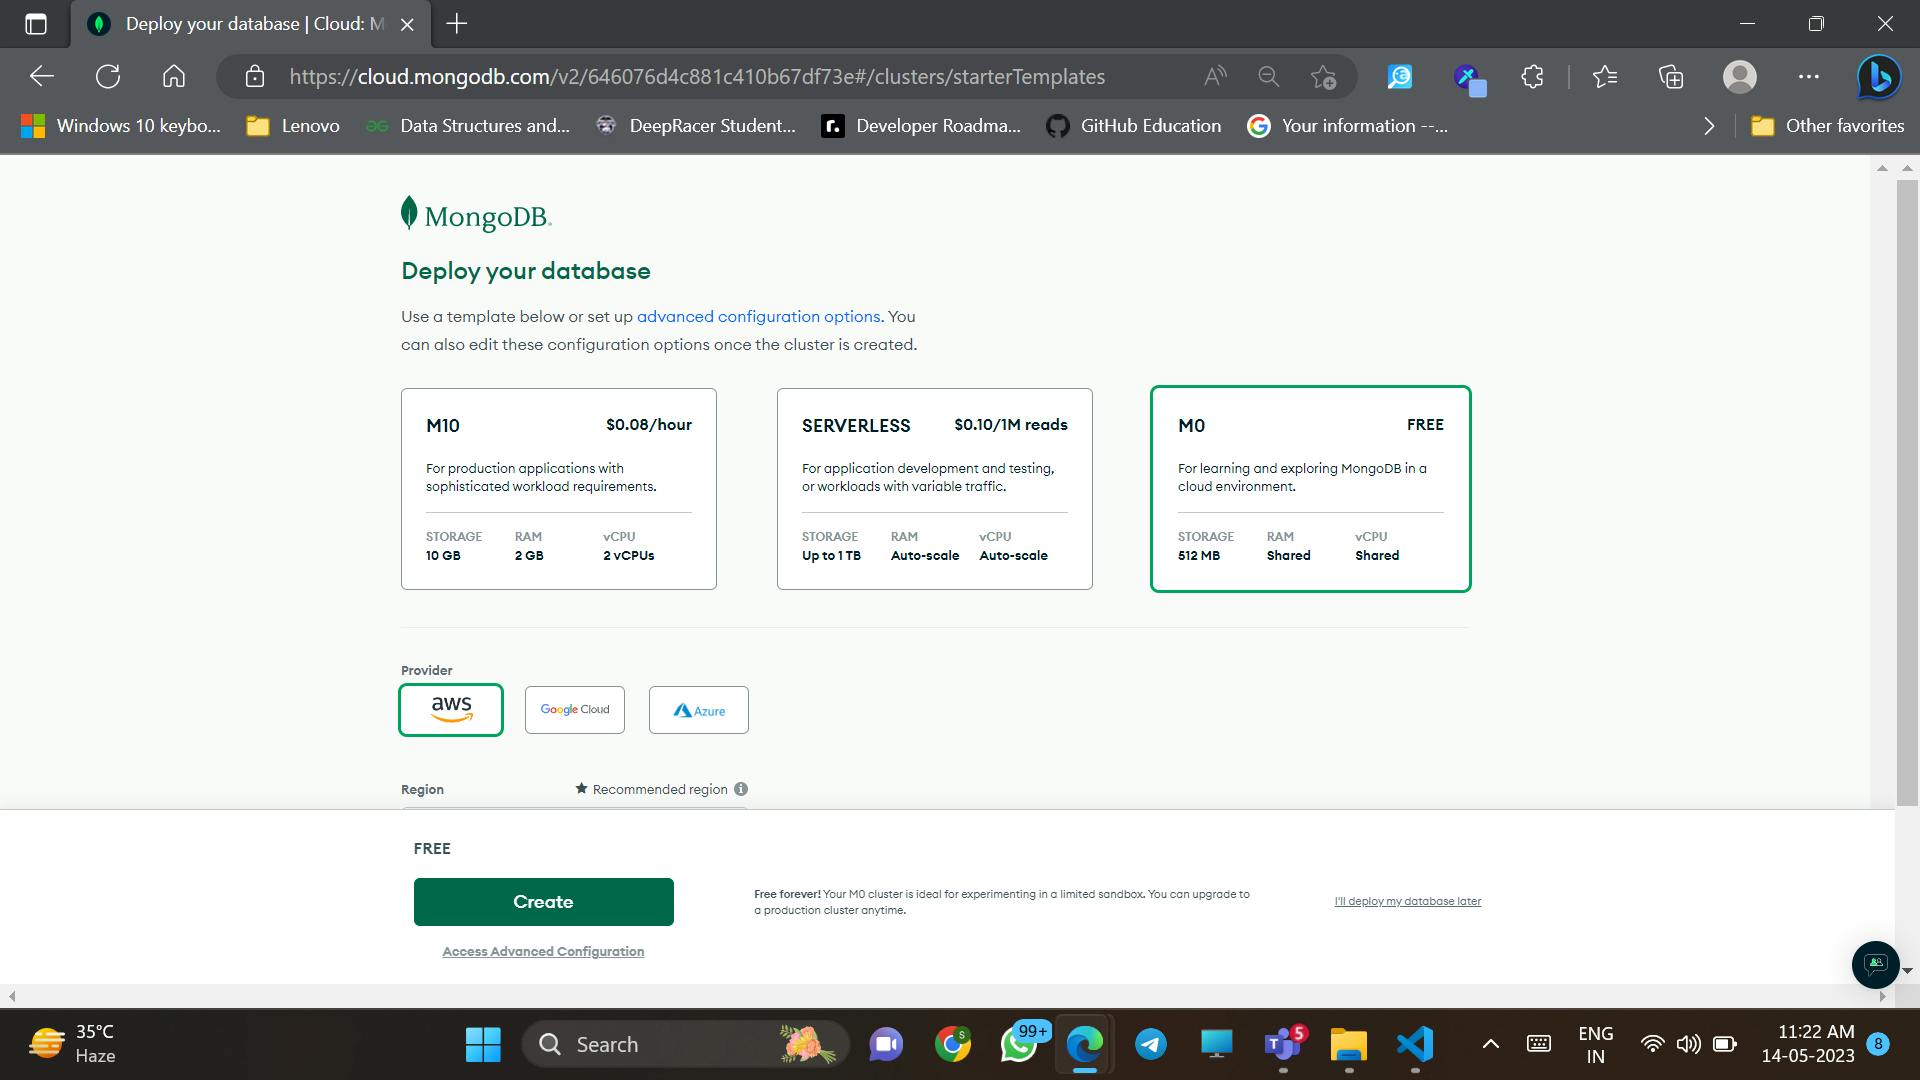
Select the M0 configuration which is the free configuration template. You may select any Provider or Region and give a name to the cluster and click on Create
What is a MongoDB cluster?
A cluster is a collection of servers and each server can hold a lot of data. This makes it faster and more reliable to store and access data.
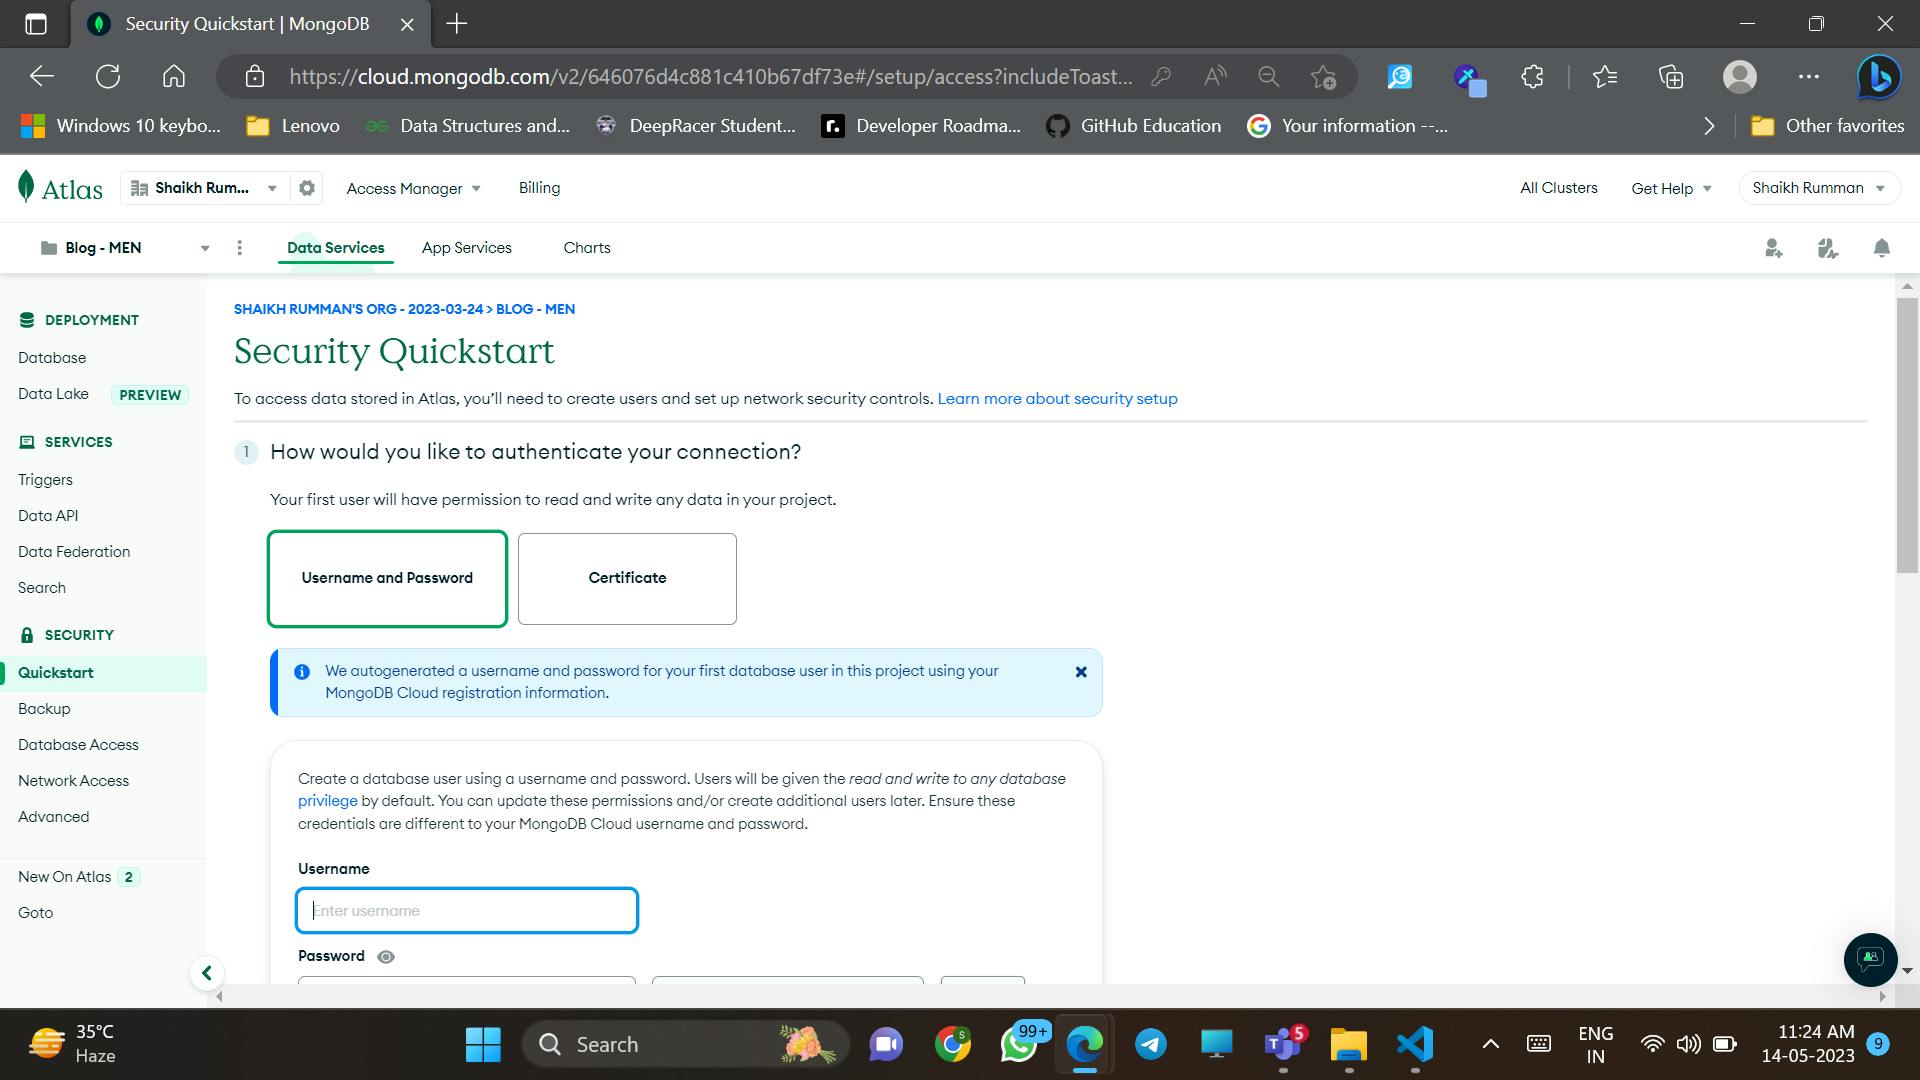
So moving on, you will be redirected to this page. Add a username (for the superuser/admin) and a password for the admin access. Save this password in .env file
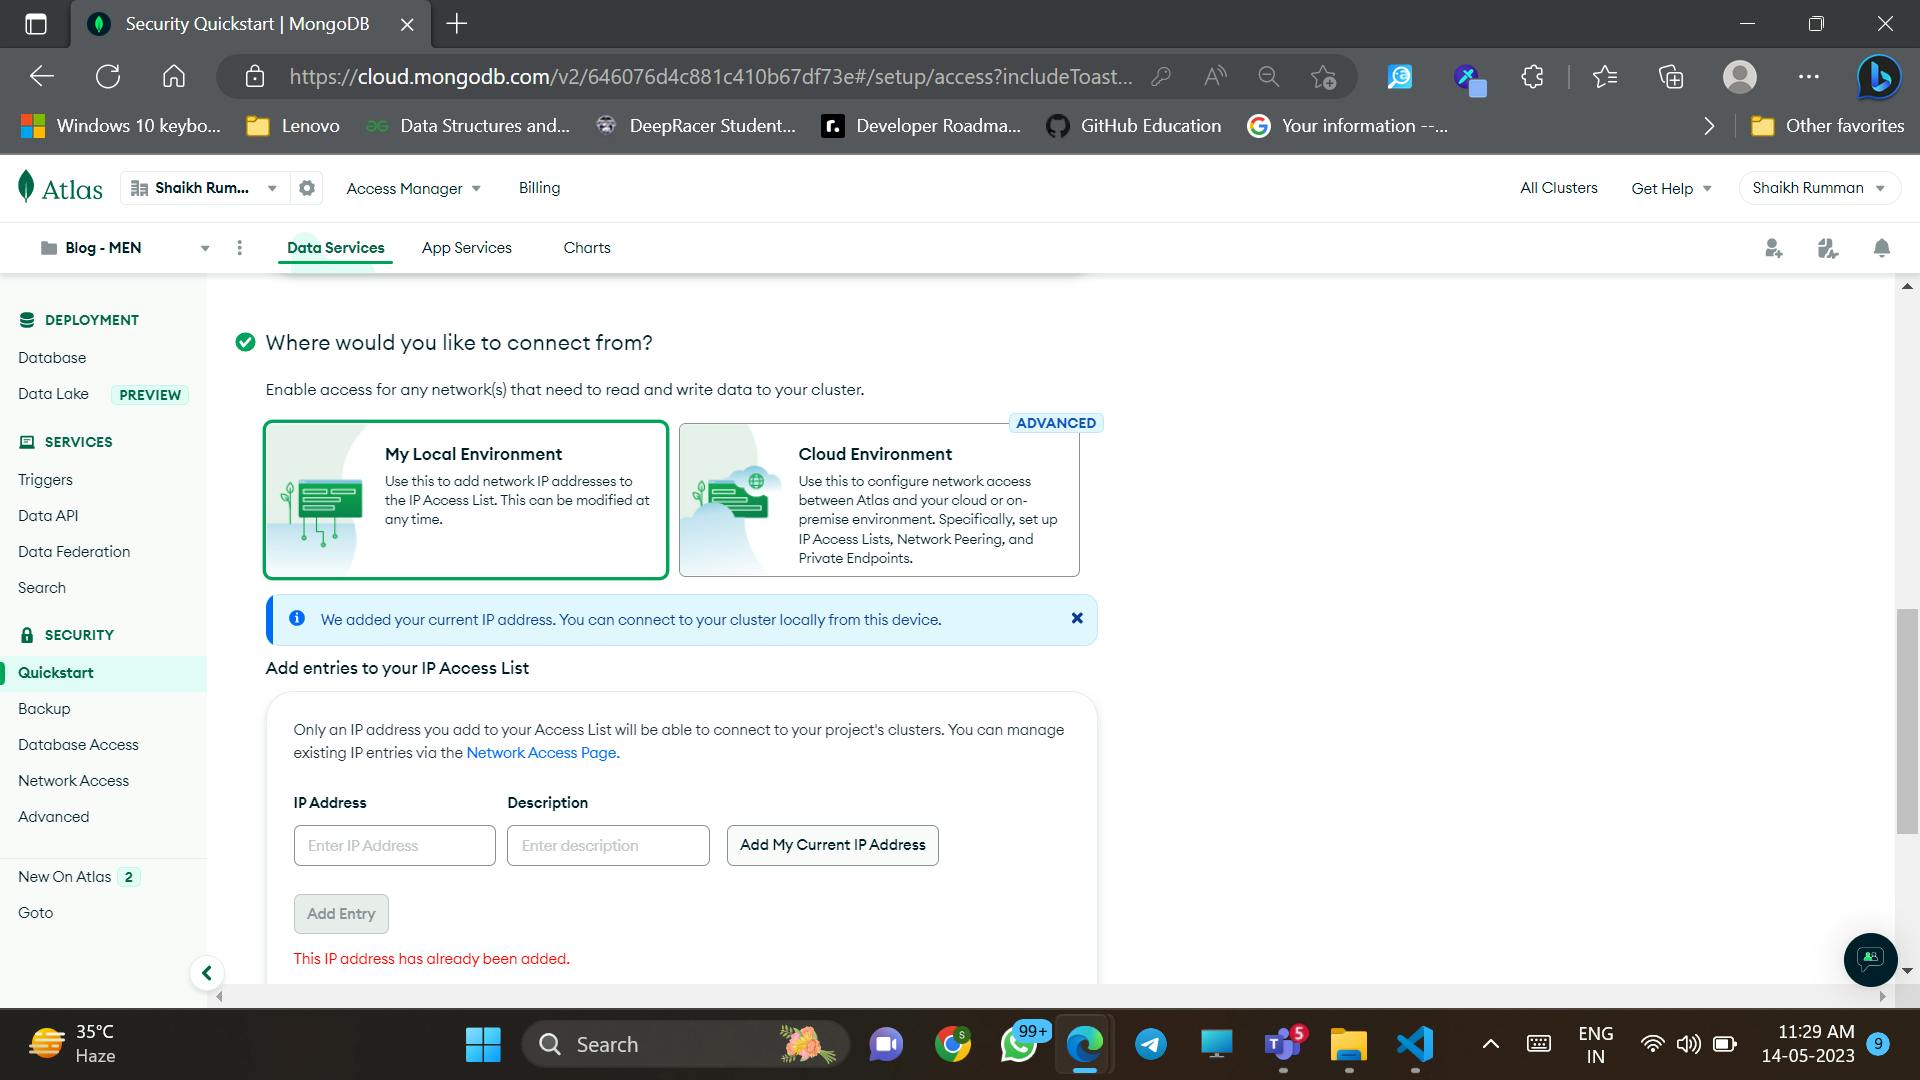
Now you have to upload the cluster to a local connection. Either you may add your IP address or if the website is hosted in a third-party service, you can add the IP address provided to you for hosting.
Great after this you will be redirected to the project dashboard. Here we have to click on connect. You can find the option adjacent to a green bullet point labeled Cluster0 on the card.

Now we have to connect our MongoDB cluster to our web application. Choose MongoDB for VSCode

You are redirected to this page. Copy the link and save it in .env file
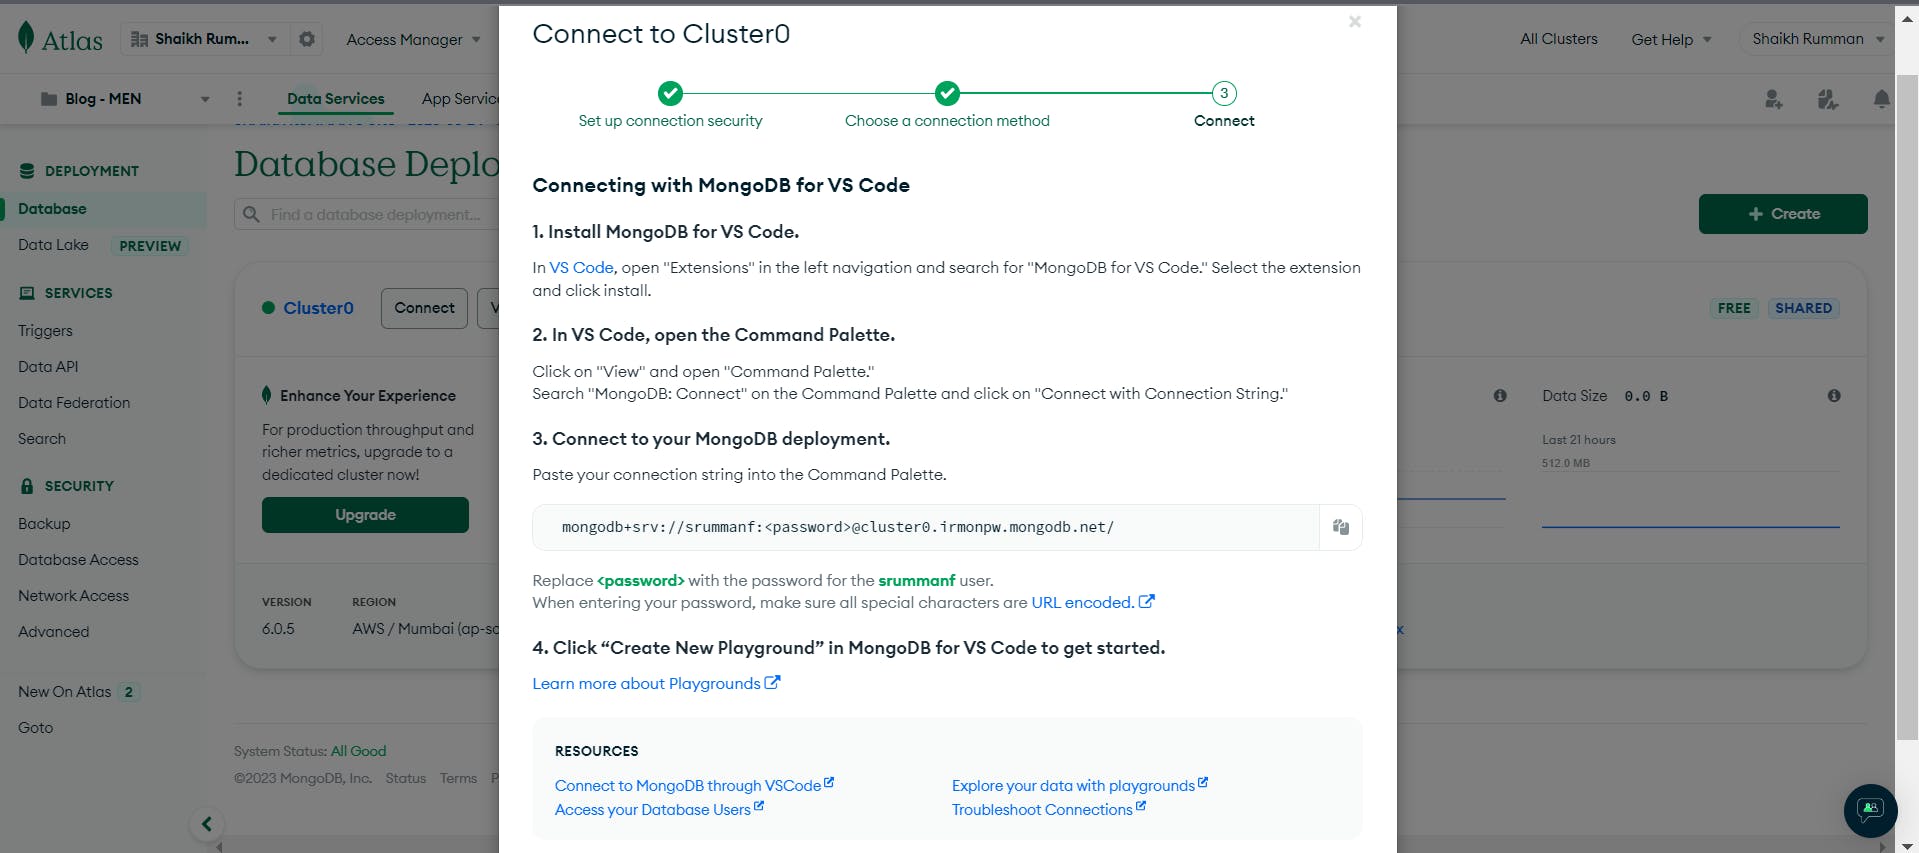
MONGODB_URI= mongodb+srv://srummanf:<password>@cluster0.irmonpw.mongodb.net/
Earlier we saved the password so remove <password> and add the password you created for the cluster.
eg: mongodb+srv://srummanf:QWERasdfg3456@cluste..
Connection to the applications via JS Files.
In db.js which was created inside config folder, we will be connecting the MongoDB cluster to our application. Add the below code snippet
const mongoose = require('mongoose');

const connectDB = async () => {
    try {
        mongoose.set('strictQuery', false);
        const conn = await mongoose.connect(process.env.MONGODB_URI);
        console.log(`MongoDB Connected: ${conn.connection.host}`);
    } catch (err) {
        console.error(err);
    }
};
module.exports = connectDB;
Let's understand the code, we import a dependency named mongoose that will be help us in dealing with MongoDB functionalities. We create an asynchronous function where we set the search property strictQuery as false, meaning if we look for a property which is not present in the schema then it wont return any error. We include our MongoDB URI from our .env file and print it in our console. For any error detected, error block will be executed. We export the function as a module to be used in other JS files.
Now we will procede to create the schema, in post.js add the below code snippet
const mongoose = require('mongoose');

const Schema = mongoose.Schema;

const postSchema = new Schema({
    title: {
        type: String,
        required: true
    },
    body: {
        type: String,
        required: true
    },
    createdAt: {
        type: Date,
        default: Date.now
    },
    updatedAt: {
        type: Date,
        default: Date.now
    },
});

module.exports = mongoose.model('Post', postSchema);
Schema is basically a table we create in a database. The code describes the properties we need along with the associated data type. We export the schema with the name Post along with the schema content. For our blog we need 4 properties in our schema:
Title: Title of the blog.
Body: Content of the blog.
createdAt: The date on which we created our blog.
updatedAt: The date on which we updated our blog,
Now we have to include our schema to our app.js. Add the following snippet of code.
// app.js

// ....

// Connect to MongoDB
connectDB(); // The asynchronous function we exported in db.js

// ....
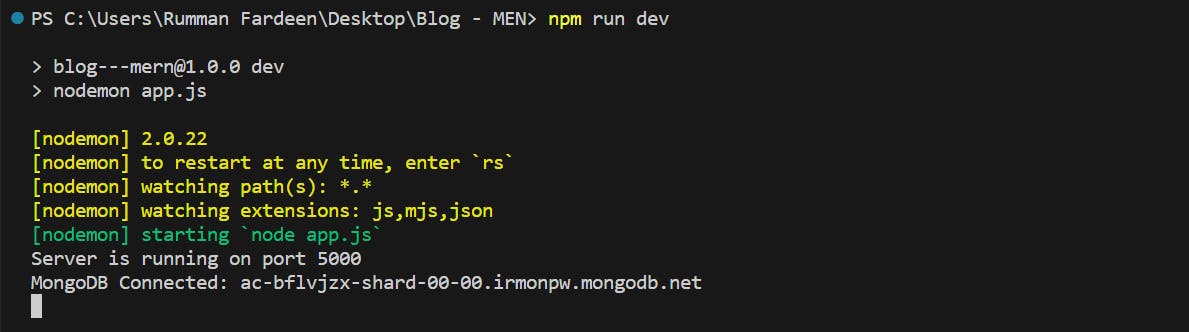
Run the command npm run dev to check whether your application is working or not. If you get your terminal screen similar to that of the below screen, you are good to go!
In Part 3 blog, we will be adding a few datas and testing the functionality of our application, making it more interactive and better user-friendly.
If you are stuck in any part, no worries refer to my GitHub repo srummanf/Blog---MEN-Stack (github.com)
Don't forget to give your opinion and give it a like if you love it. It is highly valuable for my upcoming blogs
Follow me on
See you in the next blog! Happy Coding.